Monday, October 28, 2013

Rainbow Drip Nails

This is also a design from the late summer archives ... my return to polishing after a two-month break. Seriously. I think my nails went nude for at least seven or eight weeks.

I'm a little rusty, but I think these turned out reasonably well. It's not the greatest color combination for fall, but I always love the way that white nails look so crisp and bring out the brightness of whatever shades are layered on top.


From L to R (all OPI): Casino Royale, Did it on 'Em, Fly, Kiss me on my Tulips


Sunday, October 27, 2013

More Pink and Black Color Blocking

I finally got around to sorting some of my old photos, and realized I had never posted this from the summer. I think this just goes to show the chaos my life has been lately.

In any case, here are a few quick shots of the color block I did back in July or August. I'm pretty sure this was a tape mani, using Sinful Colors 24/7 (pink) and OPI Alpine Snow (white).


Back to Blogging


​I'm almost embarrassed to start posting again after being MIA for several months, but here I am.​ It's been an insanely busy summer and early fall, but in a good way. A promotion at work has meant longer hours and events to attend on nights and weekends, but it's been so worth it. The only drawback that I can see so far is that my poor nails have been unpolished and chipped for the larger part of the last few months. I've also been doing some traveling; in August, I visited Mexico City for the first time, and more recently I took short trips to Chicago and Vegas. In the next few months, I'm heading up to SF to visit one of my best friends, then hopefully Mammoth after Christmas.

Other big(-ish) news: An article I wrote on a San Diego-area nail salon was published this summer in NAILS Magazine. Despite working in the publishing industry for the last couple years, I still get a little thrill every time I see my name in print, especially when it's on a topic that I'm really passionate about!


They got the URL wrong (glitterandglossnails.com), but still cool!

​Things will be slowing down at work in another month, so I'm hoping that by my birthday, I'll be back to doing nail art (and posting) on a more regular basis. Fun fact: Wendy and I share the same birthday in November!
As I have more time, I'm also going to try to give the blog its annual design refresh and try to talk Wendy into posting something for the first time this year.

Thursday, July 11, 2013

Summertime Blue and Purple Polka Dots

Yikes ... I've been so busy lately that I've neglected the blog a bit. I'm back today and really excited today because (hopefully) this will be the last post using photos from my ghetto-rigged lightbox! As I mentioned a couple weeks ago, the husband bought me a fancy lightbox for our anniversary so I can take some proper photos as soon as my schedule opens up.

It's been a pretty amazing few weeks. Wendy was home from dental school, so we finally sat down and had a long overdue nail polish night to create some summer-inspired manicures. This was actually done pre-Fourth of July, and a lot has happened since then (including being rear-ended on our spontaneous trip to Vegas!).

Here's some fun polka dot nail art featuring OPI and China Glaze colors.


I recently bought a new bottle of OPI Alpine Snow, so my white base is smooth and non-streaky, just the way I like it! It's amazing what a difference new polish can make.

The blue dots are done with my large dotting tool and China Glaze Hanging in the Balance; the small dots were done with the opposite end of the tool and CG Creative Fantasy. Both polishes are from the China Glaze Cirque du Soleil Worlds Away collection that came out late last year.


If you don't have a dotting tool, you could try bending a bobby pin and varying the amount of polish collected on the end to create the polka dot look. I did this the other day on my grandma's nails while I was visiting her and my mom but didn't have any tools with me, and it turned out relatively well (though the dot sizes aren't quite as consistent).


Hope to be back soon to try out my new lightbox!

Tuesday, June 25, 2013

Yin Yang Nails


I've been really busy lately with work and spending time with Wendy now that she's on her summer break from dental school, so I dug this one out of the archives for today's post. The photo quality is a little bad, but on the bright side, the hubby and I celebrated our one-year anniversary last night and he gave me a fancy lightbox setup so my images should be crisp and clear from now on!

This is actually pretty basic nail art — I started with a French mani using OPI Alpine Snow, then freehanded a diagonal tip using Sinful Colors Black on Black.


Sorry for the short post today — and for my stained, dry cuticles! Until next time ...

Thursday, June 20, 2013

Black and Red Michael Kors Print


This manicure came about as I was flipping through the pages of an old issue of Marie Claire. Some of my favorite fashion content from the magazine are the Shop the Shoot spreads, so when I came across this "Marrakech Express" page I thought the Michael Kors dress had the perfect print for a nail design (this is the only way I'll ever be able to wear that $1,000+ dress!). 

Red, white and black aren't really summery colors, but I figured what the heck — I wear flip flops during the winter, so why not black during the summer?


As usual, I started with a base of OPI Alpine Snow for the white. The polish, because it's so old, is developing a really thick consistency, so today I managed to get away with one coat.


I started out using tape (experimenting on my right hand), but when that made a mess of my edges, I gave up and decided to try my luck at freehanding. 

It's not as crisp as I'd like, but freehanding the design was much simpler than dealing with cutting the corners off pieces of tape. I started by using a thin brush to add two coats of Sally Hansen Diamonds & Rubies, followed by one coat of Sinful Colors Black on Black.


It's not my best work, but it's something different!

Friday, June 14, 2013

Neon Pink Triangles

I'm moving on from striping tape to freehand designs, which I really need to work on! I've fallen into a pattern where I'm going along great for two fingers, and then I think, "OK, this isn't as hard as I thought." And then I mess up.

Triangles seemed to be the easiest, so I grabbed one of my thin brushes and went to town.


My base color was three coats of Sinful Colors 24/7, a vibrant neon pink. I was really surprised at how the color came out — in the bottle, it's actually more of a muted hue. The formula is a bit thin, so I had to keep reapplying until I got the right opacity.


The triangles were done with Sinful Colors Black on Black and OPI Alpine Snow. I was dabbing the polish onto wax paper, but had so much trouble with clumping that eventually I started dipping the brush directly into the bottle. 


I really like the color combination here, but I definitely want to keep working on this technique, and maybe get some new brushes. If anyone has suggestions for good freehand brushes, let me know!

Friday, June 7, 2013

Mint Candy Apple Stripes

White nails are becoming my latest obsession. Before I even decided what I was going to do for today's manicure, I started with two coats of OPI Alpine White. It's really the perfect shade for summer, and at work right now we're putting out our summer issue so my brain is apparently tuned in to that frequency.

To practice my tape techniques more, I decided to try a manicure using my thin striping tape (10 for $3 from China — eBay FTW). My pinky ended up a little clunky, and on my index finger you can actually see a few smudges from where I took too much polish off. Let that be a lesson in patience.


The always-lovely mint color is Annie's favorite, Essie Mint Candy Apple.  This is a fairly straightforward manicure (three pieces of striping tape over a base color and top coat), but my one takeaway for you is this: Don't try to correct your mistake after you pull the tape too soon.


My layers were a bit too thick on my index finger, so the polish actually bled into the gap created by the tape. When I tried to go back to correct my mistake, I ended up taking too much polish off because in my rush, I forgot to sponge the excess acetone off the brush.


Moral of the story: Go slowly! Be precise when doing tape manicures, and be sure to use thin layers when polishing so the polish won't bleed.

Thursday, May 30, 2013

OPI Black and White Tips and Dots


Since its almost Memorial Day, I figured it was appropriate to bring back the bright white nails. If you're ever looking for a manicure that really pops, use a white hue for your base!

I'm trying to practice more with tape so I can perfect the super crisp lines that look great in colorblocking, and I think I've almost got it.


I started with a base of OPI Alpine Snow, the brightest white polish that I own. One of the perks of summertime is the abundance of neons, brights and out-there colors that aren't so appropriate during the other months out of the year.

After applying top coat and tape, I painted the tips (and dots) using OPI Lucernetainly Look Marvelous, a microglitter that's inky black in some light and a metallic gunmetal silver in others.

I actually used three different size dotting tools to create the dots, but I think it could be done with just one using the right pressure at each point.


Even though summer doesn't technically start until June, I just wanted to wish everyone a happy start to the season! Expect more colors than ever in the coming weeks.

Thursday, May 23, 2013

'Girls' Floral Print

I swatched the Deborah Lippmann "Girls" collection last week and decided to create a manicure using all four of the colors. I'm not sure which of the girls' styles this is most in tune with but it reminds me of those really ugly floral print dresses that I wore back in the 90s and are now (kinda?) back in style.


I started with a base of Shoshanna; the flowers were made with Jessa and Marnie, and the leaves with Hannah (that may be one of the strangest sentences I've ever typed on this blog). 


I don't love it, but it'll do (please ignore my cracked up cuticles).

Thursday, May 16, 2013

Deborah Lippmann 'Girls' Swatches

Annie got me hooked on "Girls" a little while back, so when I came across this nail polish set on the Neiman Marcus website I did a little happy dance as I added it to my cart.


This is actually my first time using a Deborah Lippmann polish. More than anything, I think I'm most in love with the adorable packaging. The bottles are pretty yet substantial, and the box features cute quotes that were on the show. I don't agree with all of the color choices, but this was a really fun find! Read on for some of my notes/thoughts on each polish.


Hannah: As a 20-something myself, Lena Dunham is a god. "Hapless hunger green" is the perfect color for self-obsessed Hannah, however. The formula, however, was just short of perfect. The color is beautiful, but I found the polish to be slightly thin—even with the three coats pictured here, there were still some sheer patches and it wasn't quite opaque.


Jessa: I wouldn't quite call this color "Bohemian burgundy"—it's more of a bright, vibrant red—but either way, I think it reflects Jessa's personality. I had some of the same problems with this polish as I did with Hannah; the formula was thin and a little streaky.


Marnie:  This "prim and proper pink" is my favorite from the whole collection. Pictured below is three coats, but the formula was even and surprisingly opaque. If you've seen the show, this is exactly the kind of color I can picture Marnie wearing.


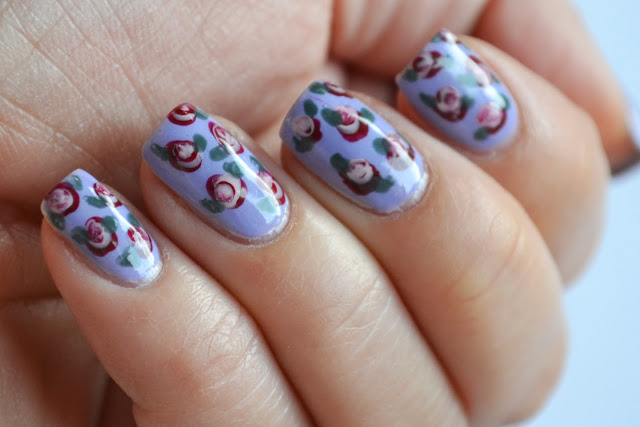
Shoshanna: I have a huge problem with this purple/lavender being Shoshanna's color. Shoshanna is the definition of all things girly, feminine and cutesy—I know they're going with the whole muted color palette for this collection, but this purple is seriously anything but "vivid." The formula was fine—somewhat sheer even after three coats, but not streaky like Jessa—but the color is just so off for the character that I'm a little disappointed.


Overall, I wasn't overly impressed with my first Deborah Lippmann polishes. I got this collection using a promotional gift card I got in the mail for buying my wedding shoes at NM last year, but I would have been really disappointed had I paid the $50 retail price.

Thursday, May 9, 2013

Mint Candy Apple Fireworks

Wendy has been doing some fun nail art designs lately, and with her dental school break coming up soon hopefully she'll be able to do a few picture posts in the upcoming weeks! Until then, I wish her the best of luck on her finals and have a fun new tape mani to share today.

I've been slightly obsessed with tape manicures lately, and while I don't have the technique down perfectly yet, each one is definitely an improvement over the last. For today's firework mani, I started with Essie Mint Candy Apple, which is Annie's most-requested shade when we do our nails together.


Next, I carefully placed pieces of tape and used Sinful Colors Black on Black for the outer part of the firework shapes. With a coat of Seche Vite, I was ready to apply OPI Alpine Snow 10 minutes later.


I would really recommend one-coat polishes, since you want to remove the tape before it starts to dry. One thing to remember though is that if the polish is too thick, you'll end up with smudges and/or heavy pools of polish at your tips.


I think I could have done a cleaner job with the lines, but I'm pretty happy with the design — which would also be great for just an accent nail on a lazy day.

Thursday, May 2, 2013

Two-Tone Blue Liquid Sand

I've been a bad blogger lately. In hopes of redeeming myself, I have a couple of new posts coming up, including today's that features a new polish from the OPI Bond Girls collection.

I should probably start out by saying that the texture of the Liquid Sand polishes is the equivalent of nails on a chalkboard to me. The texture when it first dries makes my skin crawl. I literally had goosebumps after running my fingers over the polish.


I powered through though because this color is a-mazing.Yes. So amazing I used it needs a hyphen.

First I started with a standard white (OPI Alpine Snow), layering it with OPI Lights of Emerald City. This is the only color from OPI's Oz: the Great and Powerful collection — I just wasn't feeling those other polishes, especially not the "taco" glitter. Lights of Emerald City is great though; my only complaint is that it's very hard to get those white squares of glitter to stay on the nail. 


You can see the square glitters faintly here, but they don't really stand out against the white.


I ended up layer two shades of blue over the white since it was so "blah." The top is Tiffany Case from OPI's Bond Girls collection, featuring the liquid sand finish that I find so unappealing. The bottom color is a typical creme, OPI Can't Find My Czechbook.


The colors look great together, but I'm not sure if I'll be using Tiffany Case again. Then again ... second chances and all, so who knows!

Wednesday, April 24, 2013

Pink and Teal Geometric Striping Tape Design


This manicure inflated my ego to about ten times its normal size. It may not be the greatest or most inspired nail art ever, but I've received more compliments on this design than on all of my other nail art put together — maybe that's a sign of improvement? 

I really fell in love with the color combination here and how fun and funky the design looks on my nails. I've had these on for nearly a week, which is practically a lifetime. I used a mish-mash of polishes and brands here: I started with two coats of OPI My Vampire is Buff for the base, which I actually like a lot better this time around. I topped it with a layer of Seche Vite, and once it was dry I used my striping tape to create the design. The black portion is Sinful Colors Black on Black; next was China Glaze For Audrey and Sally Hansen Rosy Outlook.

Take a look and let me know what you think!


Monday, April 22, 2013

White and Blue Chevron Stripe

Sorry (again) for my mini hiatus ... April has been an incredibly busy month so far. This was actually a manicure I did about a week ago, but haven't had a chance to edit my photos and type up a post.

For this design I used striping tape, but it looks more freehanded. I don't think I removed the tape fast enough, so some of the lines got a little distorted.

Pictured below is two coats of OPI Alpine Snow with two coats of OPI Can't FInd My Czechbook for the stripe.


Not a total failure ... I'm definitely getting better at using striping tape!

HTML/JavaScript